I did this design in related to what happen to our world now.
That was my initial idea, I brought that idea further in to making it into a movie poster.
Making into movie poster. I did not dare to try it, because I worry what I explain to my lecturer in the beginning will get it wrongly due to the outcome.
 |
| This was my sketch... |
 |
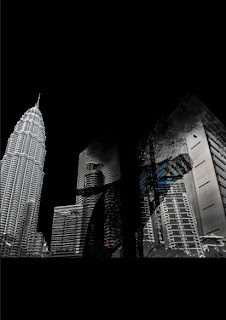
| This is my final |
This are some steps on how I edited the image.
The building
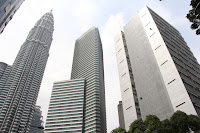 |
| before |
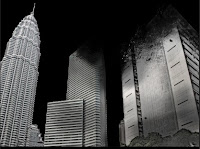 |
| after |
This the before and after of the KLCC building that I have taken.
Edit process:
I desaturate the image and then I did masking on it.
I have a total of 3 layer to create this effect
Second city
 |
| Before |
 |
| As a reflection |
 |
| Making into icy city |
 |
| Picture taken at KLCC 1.Crop and copy the image |
 |
| 1. Paste the image 2. Adjust to scale |
 |
| 1. Filter the image ( Filter > Filter Gallery > Sketch > Plaster ) 2. Adjust the effect accordingly |
 |
| This is how it should looks like. |
 |
| 1. Used quick selection tools to select the building 2. Once selection was done. Add layer mask 3. Click Ctrl + Backspace to remove background |
 |
| 1. Adjust the building 2. Edit > Transform > Perspective |
 |
| 1. Adjust the building until it fits nicely onto the other building |
 |
| 1. Create clipping mask for the city layer. |
 |
| Here is the final result you will get. Looking awesome as the reflection. |
 |
| 1. Crop the city. I used the same cropping method from above 2. Image > Adjustment > Invert 3. The reason I invert the image is because it makes the colour more easy to edit later on. (Suddenly feel smart after doing this, muahaha... did lots of experiment and researching) |
 |
| 1. Image > Adjustment > Selective Colour... 2. Adjust the white tone |
 |
| Adjust the grey tone accordingly from 'selective colour' |
 |
| Adjust the black tone accordingly from 'selective colour' |
 |
| 1. Image > Adjustment > Colour balance 2. I edit until bluish. Adjust until it looks icy icy 3. Adjust the shadow |
 |
| Adjust the midtone |
 |
| Adjust the highlight |
 |
| 1. Add in some filter making it looking more like icyyyyyyyyyy 2. Filter > Filter Gallery > Artistic > Plastic Wrap 3. Adjust accordingly. |
 |
| To make it looks like melting. 1. Rotate the whole image 2. Image > Image Rotation > 90°CW 3. Filter > Stylize > Wind4. Make sure the direction is going downwards of the building. 5. Repeat step 3 & 4 a few times 6. Once done, rotate back the image again. |
|
| This is how it should looks like ( I liquify a bit) |
 |
| Before |
 |
| Into watery whale |
 |
| Reflection to the building |
Watery whale, edit process
 |
| 1. Used pen tools and create the path around the whale. 2. Make selection 3. Add layer mask 5. Remove the background by pressing Ctrl+backspace 6. Remove selection |
 |
| 1. Filter > Filter Gallery |
 |
| 1. Artistic > Plastic Wrap 2. Adjust until my desire whale |
 |
| Tada... the whale funny looking whale. ( My mum said looks like human. ==|||) |
 |
| Adjust the size |
 |
| 1. Make the whale bend more 2. Filter > Liquify |
 |
| 1. To make the colour effect 2. Click 'create new fill or adjustment layer' > Hue and saturation 3. Adjust until I like it. 4. Apply clipping mask |
 |
| 1. Duplicate the whale layer 2. Flip the image |
 |
| Resize the image |
 |
| Change the blending option to linear burn |
 |
| I readjust the whale again |
 |
| 1. Click 'create new fill or adjustment layer' > Hue and saturation into this layer too. 2. Adjust the brightness/contrast |
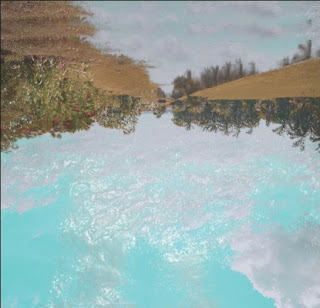
Water wave
Water splash
I did not want to take picture from the internet. So I find a way to do the water splash
Water splash, edit process
Background
Text
 |
| Before ( Only the water area is used) |
 |
| After |
Water wave process:
 |
| Crop and paste the image. |
 |
| Filter the image with plastic wrap |
 |
| Desaturate the image. |
 |
| I paste the image again. |
 |
| 1. Adjust the image. 2. I did masking. ( To blend with the desaturated water image) |
 |
| 1.Duplicate a few more water image without desaturating it. 2. Add effect to different layer of the water image ( I used filter > distort > twirl ) 3. Keep doing until I have the effect. |
 |
| After |
 |
| Before Taken in the LRT |
 |
| Copy and paste the image |
 |
| Desaturate the image |
 |
| Layer > Layer mask > hide all Only apply to the current image |
 |
| 1. Use the splatter brush to do the effect 2. Use white colour to reveal the image 3. Render the area where the splash going to be |
 |
| Rotate the brush if needed |
 |
| This image was taken from one of my classmate ( Ryan Lee Run Lin ) |
 |
| 1. I duplicate another layer. 2. The original layer, I filter with ( filter > filter gallery > plastic wrap) 3. I adjust the colour of the original layer. 4. With the copied layer, I Add masking on it. 5. Erase some of the bottom area to reveal the original layer. 6. Adjust the copied layer with 'hue and saturation' |

Making this text is not that hard.
Have to open a new page to do it. Then transfer to the poster
1. Use text tool to type the title

2. Click create wraped text > bulge
3. Duplicate text layer (hide it now, click on the "eye" icon on the layers pallette)
4. Merge the original text with the background.
5. Filter > Distort > Polar Coordination ( Pick polar to rectangular )
6. Rotate the image, Image > Image Rotation > 90°CW
7. Filter > Stylize > Wind
8. Repeat step '7' a few times.
9. Rotate the image back to original, Image > Image Rotation > 90°CCW
10. Filter > Distort > Polar Coordination ( Pick rectangular to polar )
11. Reveal back the hide layer.
Then I stylize the copied text layer.
I bring the entire layer onto my poster layer.
My Movie Poster Credit
Making this poster I learn a lot of new technique. Is pain and happiness because of deadline with pressure and final outcome.
The poster process
 |
| I downloaded the steeltongs font from this web page It have all the guideline to use it. |
The poster process
 |
| First attempt |
 |
| Adding background and edit the text |
 |
| Adjust the alignment |
 |
| Final |
Things I learn in this assignment 3:
1. Learning to work better in Photoshop
2. Beside doing the Photoshop in digital imaging class, I'm still able to work with Photoshop in other subject
3. Learning new technique, using "selective colour", "colour balance", "invert", "toggle the brush tools", "layer style", "ruler"
4. Make amazing effect with normal picture.
5. Can make a lot of changes with one picture.
6. Different approach to make the effect.
Personal feeling:
1. Maybe I'm a bit stubborn to change much or away to my sketches
2. Thinking to complicated